I recently updated this blog to use Bootstrap 4. I decided to document the process for getting Jekyll working with Bootstrap and Sass.
In this article we’ll build out a very minimal framework which allows us to easiy manipulate our CSS via Sass. In subsequent post(s) we’ll add more features and pages.
I’d encourage you to follow along, but if you want to skip directly to the code, it’s available on GitHub at: https://github.com/riebeekn/jekyll-bootstrap-4-minimal-starter
What we’ll build

Very impressive… ok, not really… this is a very minimal implementation. It does, however, provide a template that could be used as a starting point.
Prerequisites
For this tutorial you will need to have Jekyll installed. See the Jekyll installation docs for how to go about getting Jekyll up and running.
I won’t be going too deep into the workings of Jekyll, so a basic understanding of how Jekyll works would also be helpful.
Creating a new Jekyll site
We’ll be starting with a blank site… let’s get going!
Terminal
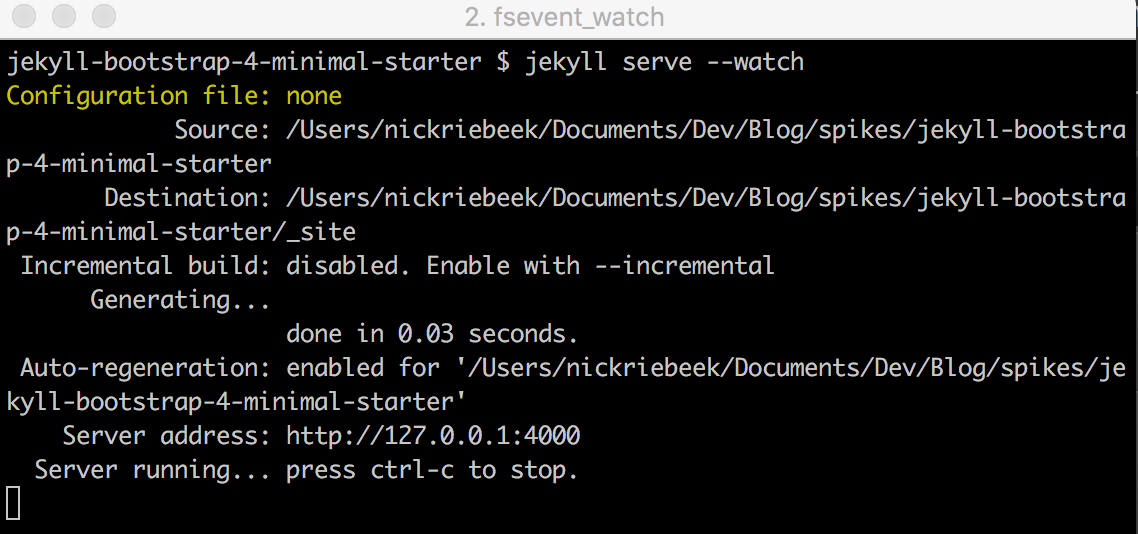
jekyll new jekyll-bootstrap-4-minimal-starter --blankNow we’ll ensure the site launches without issue.
Terminal
cd jekyll-bootstrap-4-minimal-starter
jekyll serve --livereload
You should see something similar to the below in your terminal:
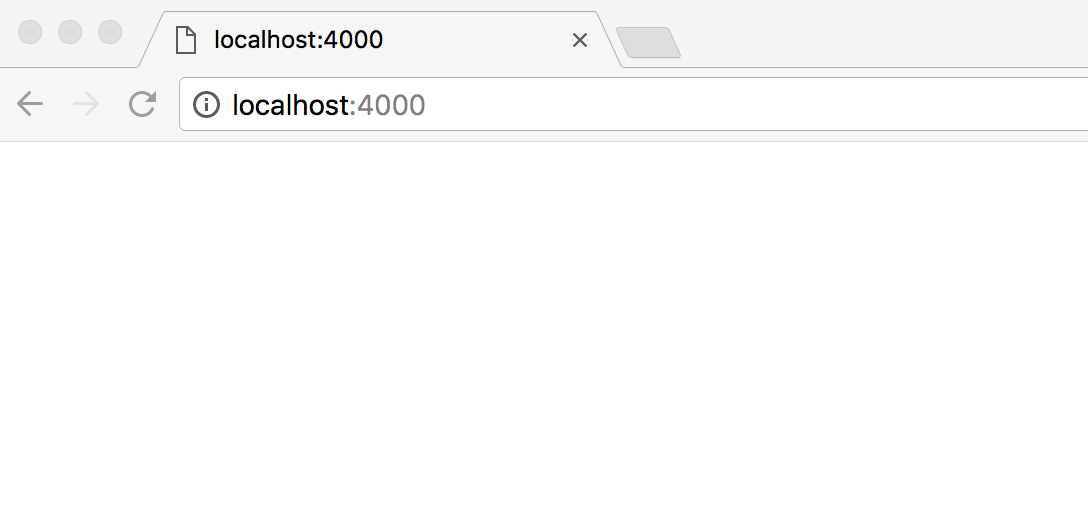
And if you navigate to http://localhost:4000/ in your browser you’ll get a very impressive blank page!
Throwing up some simple text
Initially we’re going to put everything into index.html; we’ll split things out into a more logical structure once we have everything working.
With that in mind, place the following in index.html.
/index.html
<!DOCTYPE html>
<html lang="en">
<head>
  <meta charset="UTF-8">
  <meta name="viewport" content="width=device-width, initial-scale=1.0">
  <meta http-equiv="X-UA-Compatible" content="ie=edge">
  <title>Document</title>
</head>
<body>
  <div class="container">
    <div class="row">
      <div class="col">
        <h1 class="text-primary">Hello there!</h1>
        <p>Lorem ipsum dolor sit amet, consectetur adipisicing elit. Laudantium corporis ipsam cumque rerum quas quia neque, dolor vitae laboriosam.</p>
        <i class="fas fa-thumbs-up fa-2x"></i>
      </div>
    </div>
  </div>
</body>
</html>
Some very standard HTML with a few Bootstrap classes and a Font Awesome icon.
If you view the page in your browser, it should appear as below.
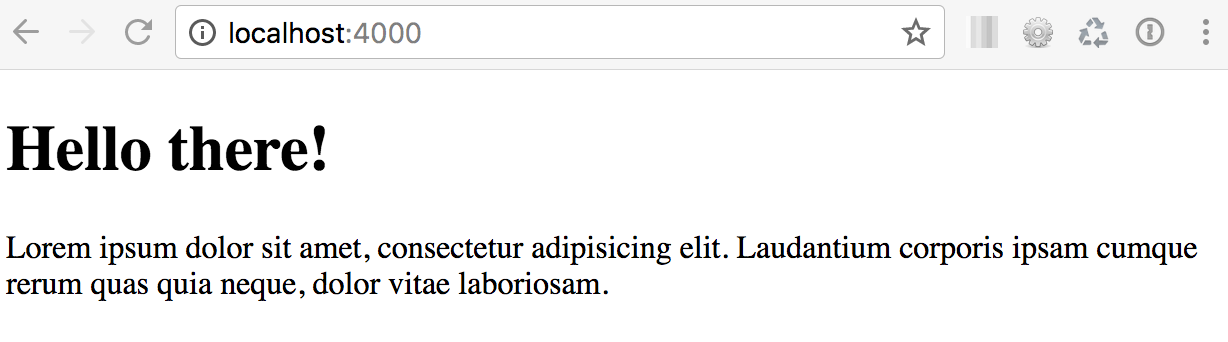
So no styling and our icon isn’t even showing up, let’s work on rectifying that!
Integrating Bootstrap
We’ll need to add both CSS and javascript files to our site in order to get Bootstrap up and running.
We’ll use CDNs for our javascript files, but since we want to be able to alter our styles with Sass, we’ll need to bring the Bootstrap Sass files along for the ride and place them directly in our application.
Create some directories to contain our CSS
First we’ll create a few directories where our CSS will live.
Terminal
mkdir -p css/bootstrap
mkdir css/custom
As you can probably guess we’ll place Bootstrap files under the \bootstrap directory, and our own stylesheets under \custom.
Download Bootstrap
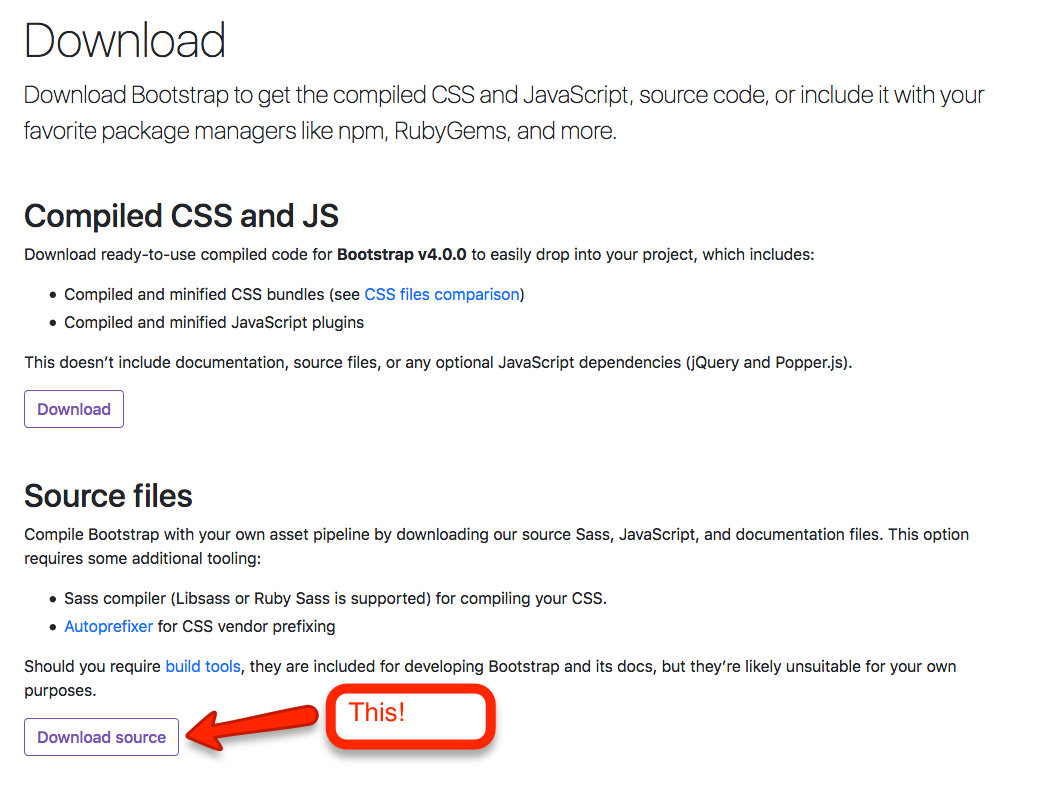
Let’s download the latest version of Bootstrap from here. Make sure to download the Source files as opposed to the Compiled CSS and JS.
Add the Bootstrap files to our site
Unzip the download and copy everything from the scss directory to /css/bootstrap, i.e. you’ll want to do something like the below (or copy the files and folders manually).
Terminal
cp -r ~/Downloads/bootstrap-4.0.0/scss/ css/bootstrap/Your bootstrap directory should now look like:

Integrating Bootstrap
Now that we’ve added the Boostrap files to our site, we need to integrate them in such a way that they are being used and can be customized.
Custom variables
First let’s create a custom variables file which will allow us to over-ride Bootstrap’s variables. This will go in /css/custom
Terminal
touch css/custom/_variables.scssIn order to be able to test things out we’ll over-ride the primary Bootstrap class.
/css/custom/_variables.scss
$primary: #8d021f; // burgundyThis will result in primary items being assigned a burgundy color instead of the default of blue.
Updating Bootstrap to use our custom variables
In order to make use of our custom variables we will alter the Bootstrap file located at /css/bootstrap/bootstrap.scss. We’ll simply import our variables.scss file at the top of the existing file.
/css/bootstrap/bootstrap.scss
/*!
 * Bootstrap v4.0.0 (https://getbootstrap.com)
 * Copyright 2011-2018 The Bootstrap Authors
 * Copyright 2011-2018 Twitter, Inc.
 * Licensed under MIT (https://github.com/twbs/bootstrap/blob/master/LICENSE)
 */
@import "../custom/variables"; // we've added this line
@import "functions";
@import "variables";
@import "mixins";
@import "root";
...
...
The purpose of the bootstrap.scss file is to pull in all the Bootstrap Sass files. You can further modify it if you wish. For instance, if there are parts of Bootstrap that you know you won’t be using, you can omit the import statements for those features.
One thing to note… it is important to import the custom _variables file prior to the Bootstrap variables file. This is necessary in order for our custom variables to over-ride the bootstrap defaults. If we add our file after we’ve already imported the Bootstrap file, our custom variables will not over-ride the Bootstrap defaults.
Create the main css file
Finally we’ll create the file we’ll be linking to in the head section of our site.
Terminal
touch css/main.scss/css/main.scss
---
---

@import 'bootstrap/bootstrap';
Simple, all we need to do is import the bootstrap.scss file.
Telling Jekyll where to find our styles
We also need to tell Jekyll where our Sass files are located so that it can compile them into CSS.
This is done via the Jekyll _config.yml file.
Terminal
touch _config.yml/_config.yml
# Site settings
title:
email:
author:
description:
url:

# Build settings
permalink: :title/
sass:
  sass_dir: css
We’ve added a few default properties that you can fill in if desired, the important line is sass_dir. This tells Jekyll where to look for our Sass files. You’ll need to restart the Jekyll server in order to get the configuration settings to take affect:
Terminal
jekyll serve --livereloadThe final step is to update index.html to link to the stylesheet generated by Jekyll.
/index.html
<!DOCTYPE html>
<html lang="en">
  ...
  ...
  <!-- add this -->
  <link rel="stylesheet" href="/css/main.css">
</head>
<body>
...
...
With these changes in place, our styles appear:
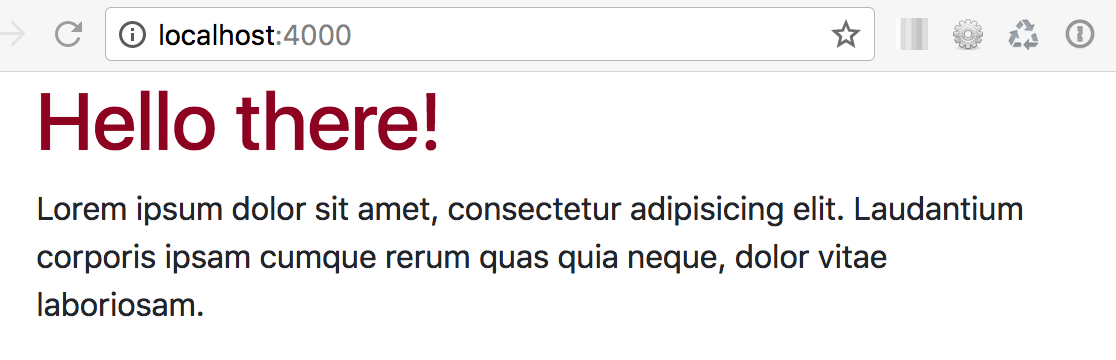
We still don’t see the icon showing up… this is because we have not included the Font Awesome javascript files. We’ll update index.html to include all the necessary javascript files. In addition to the Font Awesome files, we also need to include jQuery.js and Popper.js, both of which are used by Bootstrap… and we also need to include the Bootstrap javascript file.
/index.html
  ...
  ...
  <!-- JS -->
  <script defer src="https://use.fontawesome.com/releases/v5.0.8/js/all.js" integrity="sha384-SlE991lGASHoBfWbelyBPLsUlwY1GwNDJo3jSJO04KZ33K2bwfV9YBauFfnzvynJ" crossorigin="anonymous"></script>
  <script src="https://code.jquery.com/jquery-3.2.1.slim.min.js" integrity="sha384-KJ3o2DKtIkvYIK3UENzmM7KCkRr/rE9/Qpg6aAZGJwFDMVNA/GpGFF93hXpG5KkN" crossorigin="anonymous"></script>
  <script src="https://cdnjs.cloudflare.com/ajax/libs/popper.js/1.12.9/umd/popper.min.js" integrity="sha384-ApNbgh9B+Y1QKtv3Rn7W3mgPxhU9K/ScQsAP7hUibX39j7fakFPskvXusvfa0b4Q" crossorigin="anonymous"></script>
  <script src="https://maxcdn.bootstrapcdn.com/bootstrap/4.0.0/js/bootstrap.min.js" integrity="sha384-JZR6Spejh4U02d8jOt6vLEHfe/JQGiRRSQQxSfFWpi1MquVdAyjUar5+76PVCmYl" crossorigin="anonymous"></script>
</body>
</html>
With that, we finally see the icon showing up:
Time to refactor!
Now that everything is working, let’s add some proper structure to our site. We’ll create a layout and a few include files so we don’t have everything crammed into index.html.
Adding a layout
First off we need to create a directory to hold our include files.
Terminal
mkdir _includesWith that out of the way, our plan is to create a single layout file and extract our head and footer elements out of index.html. Let’s create the files.
Terminal
touch _includes/head.html
touch _includes/footer.html
touch _layouts/default.html
We’ll start with default.html, this will determine the basic structure of our pages.
/_layouts/default.html
<!DOCTYPE html>
<html lang="en">
  {% include head.html %}
  <body>
    {{ content }}
    {% include footer.html %}
  </body>
</html>
Pretty straight-forward, we have our standard HTML declaration and we’re including our soon to be created head.html and footer.html files. The {{ content }} tag will be replaced by whichever page is currently being displayed.
The head.html and footer.html files are also straight-forward, they contain the head and footer sections we previously placed in index.html:
/_includes/head.html
<head>
  <meta charset="UTF-8">
  <meta name="viewport" content="width=device-width, initial-scale=1.0">
  <meta http-equiv="X-UA-Compatible" content="ie=edge">
  <title>Jekyll and Bootstrap</title>

  <link rel="stylesheet" href="/css/main.css">
</head>
/_includes/footer.html
<!-- JS -->
<script defer src="https://use.fontawesome.com/releases/v5.0.8/js/all.js" integrity="sha384-SlE991lGASHoBfWbelyBPLsUlwY1GwNDJo3jSJO04KZ33K2bwfV9YBauFfnzvynJ" crossorigin="anonymous"></script>
<script src="https://code.jquery.com/jquery-3.2.1.slim.min.js" integrity="sha384-KJ3o2DKtIkvYIK3UENzmM7KCkRr/rE9/Qpg6aAZGJwFDMVNA/GpGFF93hXpG5KkN" crossorigin="anonymous"></script>
<script src="https://cdnjs.cloudflare.com/ajax/libs/popper.js/1.12.9/umd/popper.min.js" integrity="sha384-ApNbgh9B+Y1QKtv3Rn7W3mgPxhU9K/ScQsAP7hUibX39j7fakFPskvXusvfa0b4Q" crossorigin="anonymous"></script>
<script src="https://maxcdn.bootstrapcdn.com/bootstrap/4.0.0/js/bootstrap.min.js" integrity="sha384-JZR6Spejh4U02d8jOt6vLEHfe/JQGiRRSQQxSfFWpi1MquVdAyjUar5+76PVCmYl" crossorigin="anonymous"></script>
Using the layout
To use the layout, we just need to update index.html:
/index.html
---
layout: default
---

<div class="container">
  <div class="row">
    <div class="col">
      <h1 class="text-primary">Hello there!</h1>
      <p>Lorem ipsum dolor sit amet, consectetur adipisicing elit. Laudantium corporis ipsam cumque rerum quas quia neque, dolor vitae laboriosam.</p>
      <i class="fas fa-thumbs-up fa-2x"></i>
    </div>
  </div>
</div>
And that finishes things off, we’ve adding some structure to our site, and things should be displaying in the browser exactly as they were before refactoring.
Summary
We’ve created a minimal starter template for building out Jekyll sites with Bootstrap and Sass. In subsequent posts we’ll add some additional functionality such as navigation, a banner, displaying of posts and a simple archive and about page.
Thanks for reading and I hope you enjoyed the post!